Saturday, August 19, 2023

Welcome to my Page 🪴


Hi, welcome to my everything plants blog. This blog will give tips for zone 5/6, houseplant tips and ideas, and some yoga poses. Welcome and come with me as I document weekly my vegetable garden journey and tips and tricks. Also, I am a Christian and will post a devotional here and there. Join me and let's garden together.

Tuesday, August 15, 2023

Soilless houseplant potting soil mix

Why a soilless plant mix?

The popular idea is to grab a bag of potting soil from the local garden center and pop your brand new plant right in. Unfortunately, the new plant could be doomed to a slow death. Most of our premade potting mixes are water retaining and fungus gnats magnets. Don't get me wrong I used the premade potting mixes for years and had successes and utter failures. I attributed my failures to my gardening knowledge and took it a bit personal. When I started doing my research I found two problems with my house plant journey. One, I was using pots without drainage and watering them way, way to much. Two, I was using a prepackaged potting mix. 

So, I went on a year long journey to find out what makes the best soil for my plants. The easiest and most cost effective I found was using a prepackaged mix and adding in 50% perlite. My plants did okay, but not what I was looking for. I tried adding in sand and sphagnum moss and just didn't like the consistency. I added leca balls and really like that it gave it a chunkier consistency. The I found coco chips and fell in love with the way my plants improved. I used a popular soil mix specifically for indoor or tropical plants and it was full of fungus gnats. That's when I found mosquito bits and started to mix them in the soil too. It was a long journey to get to the point of a satisfying soilless mix. 

Soilless mix for house plants:

2 bags of soilless houseplant potting soil (try not to get anything with too much peat moss)
1 1/2 cups of perlite
2 bags of orchid bark
2 lbs of Leca balls
1.3 lb block of compressed coco chips
1 cup horticulture charcoal
1 1/2 cups vermiculite
1/4 cup of mosquito bits

Most of the products like perlite and vermiculite I can purchase at my local garden center. Most of my garden centers just sell the prepackaged potting mixes. I do a lot of online shopping. When I order everything I make sure that I make a huge batch. This mix will make a large storage container full of mix. I do keep it in a container with a lid, just to keep it clean. 

Make sure that you use pots with drainage holes. The old advice was to put rocks in the bottom and the plants will wick the water up and it will help with humidity. It really doesn't. If you're want to use the nice pots with no holes put your plant in a nursery pot before you put it in the cover pot. That way it can drain out when you water. 

I always let my plants dry out before I water them again, this helps not only with not over watering but also helps with not giving root rot to your plants.

I hope this was helpful. If you hav any questions just ask. Also, find what works best for you. This is just a basic starting recipe for most plant types.

Tuesday, June 12, 2018

Easy Container Art 💐

This time of year it's hard to find things to do. Your garden is planted and now you wait for the harvest. During this blog you will learn step by step instructions on how to make some artful containers to fill your house and garden with.

The first container is one that is very versatile and I have been making for years.

Chic Garden Container:

Supplies needed:
One canning jar (any preferred size)
Rebar tie wire (can be found at any hardware store)
Wire cutters
Needle nose pliers
Thin wire
Assortment of beads

Supplies for filling:
Candles
Potting soil
Plants
Cut flowers

Step 1
Cut 2 pieces of wire that are about three times as long as the jar.
Step 2
Wrap one piece of wire around the jar and leave about three inches on one side and the rest of the length on the other. Twist wire together. Using pliers gently tighten. Continue the same on the other side.
Step 3
Take the long end of the wire and twist together at the bottom of the jar. Using pliers twist gently to tighten at the bottom.
Step 4
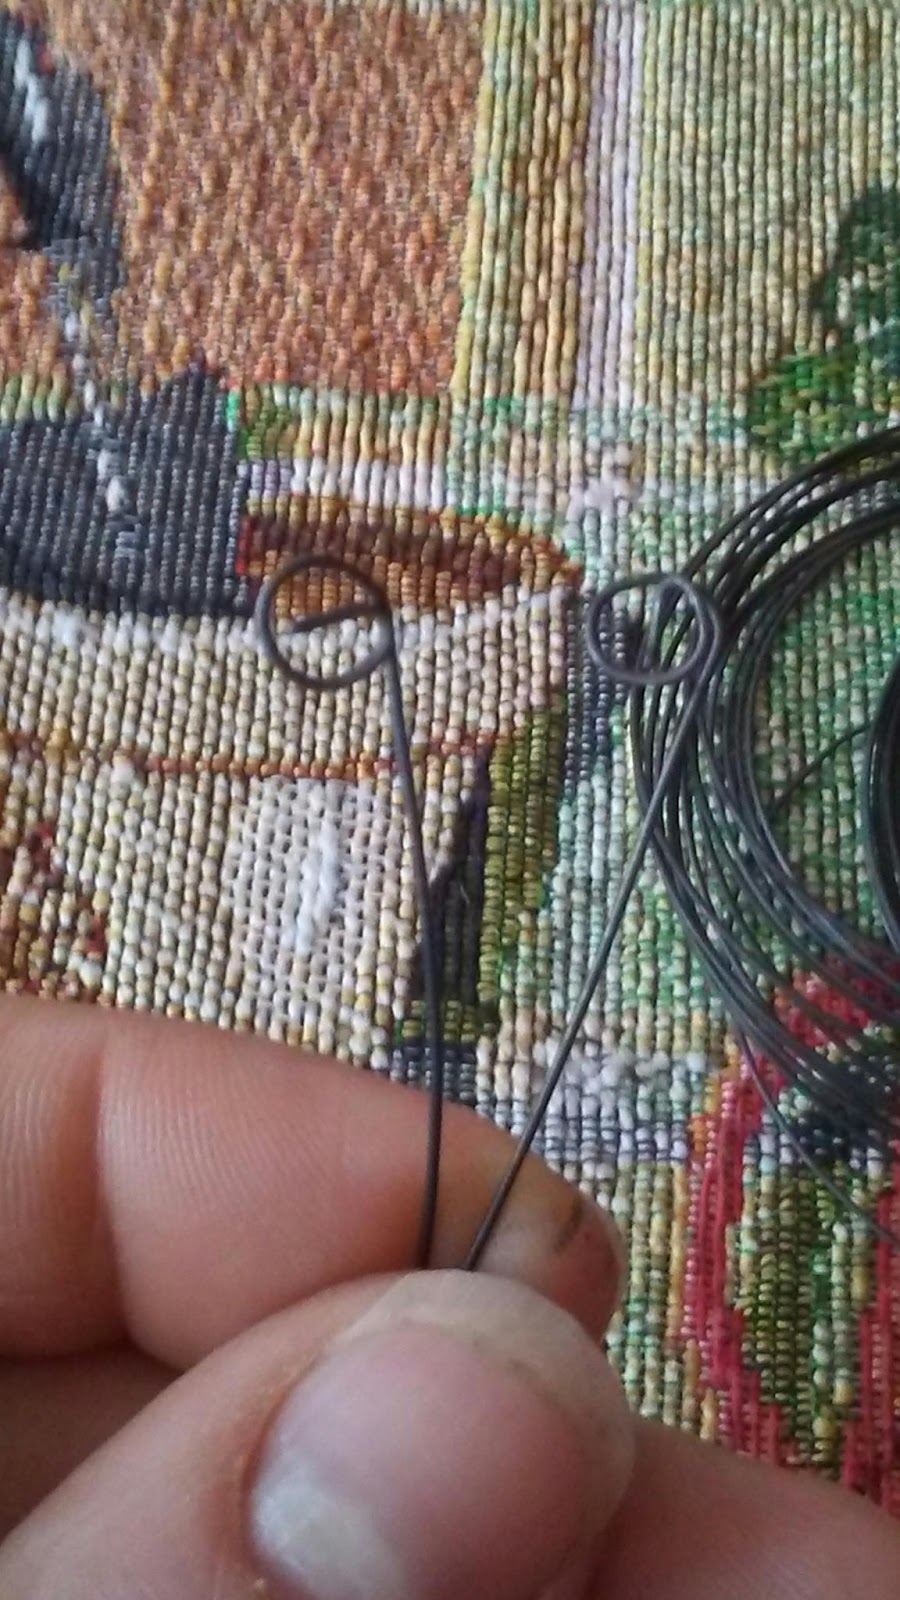
Next, the top two small wires curl them with your needle nose pliers.
Step 5
Curl the long bottom wires and make a cute curly design. Take your time and curl the wires around tour fingers and use the needle nose pliers to make curls.
Step 6
Cut a piece of wire for a hanger as long or short as you wish. Attach to the top of the jar.
Step 7
Pick out some beads of your choice. An broken necklace, plastic beads or whatever you like.
Step 8
Cut 2 small lengths from the thin wire and curl the ends of the lengths with the needle nose pliers.
Step 9
Add beads make each side the same or different is all about what you decide. Attach to small curls of wire on the jar.
Step 10
Add to your garden.

Dino Containers:

This project is fun to make if you have kids.

Supplies needed:

Plastic hollow dinosaurs
Spray paint (colored and primer)
Heavy duty scissors
Potting soil
Variety of succulent and cactus starts

Step 1
Wash your dinosaurs good so that the paint will stick good.
Step 2
Cut the backs of the dinosaurs open.
Step 3
Use your spray primer and prime all your dinos.
Step 4
When primer is dry, start spraying them with your color choices. It may take several coats. Coat them good so that the color of the dinosaur doesn't show through. Let dry overnight.
Step 5
Fill with potting soil. Make sure to push it into the tails and head area.
Step 6
Plant your small starts. (Succulents and cactus are preferred.) Enjoy!

Thursday, May 3, 2018

Avocado from seed to tree..... 🌳

A good tree cannot bear bad fruit, and a bad tree cannot bear good fruit.
Matthew 7:18 NIV


In this months blog we will be looking at how to properly propagate an avocado seed from the grocery store.

Three Year old sapling.

First, you need to soak your seed over night in a glass of water.

Seed being soaked over night in water.

Next, the seed need to be thoroughly cleaned. This prevents mold and disease.

Cleaned Seed

Second, the skin of the seed needs to be slightly scored with a knife to help the tree shoot break through. Then poke several toothpicks into the prepared seed. Locate at 12 o'clock, 3 o'clock, 6 o'clock & 9 o'clock.

Prepared Seed

Next, place seed on top of a glass cup.
Next, fill the glass with clean water and make sure that the water is changed daily. This is the key to prevent seed rot.

Seed in Water

Watch your seed grow. It can take several weeks for your seed to start sprouting. It resembles a bean sprout at first.

Cracked with first sprout.

With some diligence your seed will begin to sprout leaves and roots. When your jar is pretty full of roots transplant to a small pot. Transplant as the tree grows.

Sapling with roots
Here is the tree from the original seed three years later. The avocado tree makes a nice house plant. 
They are a rather slow growing tree and sometimes take up to 15 years to produce a single avocado. These plants require a lot of patience.


Monday, April 23, 2018

🍄 Wonderland Fairy Garden

Supply list:
🍄 cactus potting soil
🍄 potting soil
🍄 3 of the same size terracotta pots
🍄 Wonderland fairies and accessories
🍄Small wood rounds
🍄 3 bricks of height adjustments

Plant list:
🌵3 varieties of hen and chicks
🌵Chocolate sedum
🌵Light green sedum
🌸spotted dead nettle
🌸Sorbet raspberry voila
🌸Irish moss
🌸Delta premium blue blotch pansy

Three Pots on Three levels

Keep your imagination open on this project. Always make your fairy garden your own. I purchased the wonderland characters online. They are actually cake toppers. The rest of the decorations were purchased at a local hobby store.

Red Queen Level

I started with the red queen pot and made it into a succulent pot. 
With a mix of sedum and hen and chicks because they don't mind the shady areas. 
Because its the red queen I incorporated flamingos, white and red bushes, and tweetle dee and tweetle dum.


Then I did the mad hatter pot. It has irish moss and violas mixed in. I purchased a small cup and saucer from a local thrift store. I felt like it emphasizes the mad hatter theme. I included some wire fencing and the wooded ladder. You can make your own wooden ladders out of sticks and hot glue from your yard for a cheaper route. I included fake mushrooms in this pot throughout.

Mad Hatter Level.
I finished with the Alice pot. I used the nettle and the pansies in this pot. Pansies are nice in the shade and if watered and fertilized they should bloom all summer. I included more wood rounds and fake mushrooms throughout. Also, I included a small tea pot shaped house to help tie it together.
Alice Level


Just remember all fairy gardens are you own creation. Have fun and fairy on.

Friday, January 22, 2016

Guide for the Northwest 
for Planting a Garden:

Things to do in January:

Start looking through the seed catalogs and find the seeds you want - Look for shorter season seeds
Order the Seeds you decide on

Starting approximately the 18th:
Start your Onion and Strawberry seeds indoors. I planted alpine strawberries this year. 
My onion seeds are self collected ones and shallots seed.

Starting approximately the 24th:
Start you slower growing herb seeds: marjoram, oregano, thyme, and winter savory.

Things to do:

Make sure that you sterilize any reused pots or packs.
I use a mixture of 50% seed starter and 50% Moisture control potting soil.
Also, I use the mini window green house starter kits from your local do it yourself store.

Good Luck and talk next week.


Saturday, August 8, 2015

Drying Herbs.....

This Weeks Bible Verse:
Genesis 1:11 - And God said, Let the earth bring forth grass,
 the herb yielding seed,
 [and] the fruit tree yielding fruit after his kind, 
whose seed [is] in itself, 
upon the earth: and it was so. 


Let's look at different drying methods and styles:

  • Drying Techniques:
    • There are several ways that herbs and cut flowers can be dried. Below is a brief look at how these plants can be dried.
      • Upside down drying: this is the longest method of drying. It can take several months for some plants to dry, but the flavor of herbs and spices is more potent because the oils are held in to the plant better.
      • Dehydrator method: is the quickest way to dry herbs, instead of months it take hours to dry the plants. Also, with the dehydrator you can dry fruits and vegetables. On the down side some of the nutrition value is lost.
      • Silica Sand: is a pretty quick method of drying. The plants are dried in about a week. The down side is that flowers and plants that are dried CANNOT be consumed. This is for flower arranging and other floral options only. I for one grow a dried flower section in my garden so this method is great for me to use, because the flowers hold their color and shape better.
This is an option for drying herbs and flowers.
I dry them on hangers in an unused closet space.

  • Upside down drying:
    • Gathering- when cutting your herbs or flowers for drying make sure that they have a long enough stem to tie and dry.
    • Washing- Make sure that all herbs you use are washed before hanging. The herbs do need time to dry because they will turn black if left wet.
    • Bundling- Make sure that when you bundle your herbs to dry that the bundle is not too huge. The herbs will slowly fall out of the bundle sometimes. Make sure that you use cotton twine or jute to tie them into bundles. Hang them upside down and check them regularly for their dryness. Hang them in a cool dark place for the best results.

This option shows how they can be dried on the way. Be creative too.

  • Dehydrator:
    • Gathering- the stems for this process can be rather short. Most of the time only the leaves are dried and not the stems anyway.
    • Washing- Make sure that the plants are completely dry before you place them in the dehydrator because they will turn black.
    • Process- this takes a little more time to get ready to dry than the upside down drying system, because you need to remove each leaf from the stem and lay them flat on each tray of the dehydrator.
    • Drying time- Make sure to check your plants and flowers every hour to make sure they are drying evenly. It normally takes about 3 to 4 hours to dry one batch of herb leaves.

  •  Silica Sand:
    • Gathering: this is really used for drying flowers. Make sure that you gather just the head of the flowers.
    • Washing: no washing is necessary because they are not for edible uses only crafting use.
    • Process: Place the flower in a container and cover with craft silica sand until you can no longer see the flowers.
    • Drying time: This process takes about a week to complete. What the silica sand does is it takes the water out of the plants. The flowers will have more color and vibrancy when dried this way. Use in dried flower craft projects.

Well if anyone can think of other ways to dry plants and flowers add them to the comments.